Bible MiniWorld - new sets available to download


   Travel back in time to the Biblical era with this series of Bible MiniWorld depicting the life of Moses. This series of Bible MiniWorld will portray different events in the life of Moses, from his rescue from the Nile River while he was still a baby to the time of the Exodus leading the Hebrew nation out of bondage and out of Egypt to the Promised Land.


   This Bible MiniWorld series is compatible with other MiniWorld set (The Castle, The Dinosaur series, The Vikings). Once you have downloaded a set you can use different parts such as the terrain tiles or scenery to add to your other new sets; also you can print several copies of certain parts and assemble them in a variety of ways to create a larger set.

   Then you can use these for a diorama display, for re-telling a story, or even to play with.

  
   Bible MiniWorld “The Hebrew houses” comes with 3 houses, a palm tree and several MiniPeople and animals, this set is created to portray the Hebrew dwellings while they were living in Egypt, but they can be used for other Biblical scenes as well. You can print several copies of these houses and terrain tiles to create a larger town.

Link to the model "Hebrew Houses"
http://www.mylittlehouse.org/hebrew-houses.html


   Bible MiniWorld “Slaves in Egypt” comes with one small shelter, a palm tree and several MiniPeople, a table and scrolls and many little bricks. This set is created to portray the Hebrew people working as slaves making bricks to build Pharaoh’s palace. This set includes a figure of young Moses, a prince of Egypt. You can use this set to re-tell the story of the Hebrew people in bondage in Egypt, or later in the story when young Moses visits his Hebrew brothers and strikes the guard before fleeing Egypt to hide from Pharaoh.

   You can print out other copy of the terrain tiles or palm tree or other parts to create larger scenery or add to other parts of the Bible MiniWorld sets.

Link to the model "Slaves in Egypt"
http://www.mylittlehouse.org/slaves-in-egypt.html


   Bible MiniWorld “the Princess and the Baby” comes with the front building of Pharaoh’s Palace, 4 terrain tiles, 2 palm trees, lots of reed and papyrus plants as well as several MiniPeople, including baby Moses and his basket as well as some animals (cats and frogs).

   You can also visit my web site at this address to download free additional terrain tiles, grass, river that you can add to your scenery.
http://www.mylittlehouse.org/terrain-tiles.html

   This set is created to portray the story of baby Moses in a basket floating on the River Nile and being rescue by the princess, the daughter of Pharaoh. Included with this set is a photo booklet retelling the story using the model set.

Link to the model "The Princess and the Baby"
http://www.mylittlehouse.org/the-princess-and-the-baby.html

Bible MiniWorld – Preview of "Pharaoh's Throne Room"


Here are a few photos of the next Bible MiniWorld set in the works: “Pharaoh’s Throne Room”, which will be a continuation of the front of the building found in the “Baby Moses” set. This will be the scene where Moses confronts Pharaoh and his magicians in Exodus 7, verses 8 to 12, asking him to let the Hebrew people go.


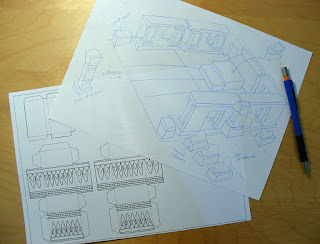
Right now it is still in the rough stage, trying out the different pieces to make sure everything fits properly. I usually start the process with some sketches to get the basic idea of the different needed parts. I check some books at the library and on line, then…
I start to create the actual model in 3D, the challenge being to create the pieces first flat with different folds in order to create the actual 3D pieces.


I draw the different pieces on computer, then once that is done, I print everything in black and white to try out and see if all the parts fit correctly. Usually at that stage there are small things to fix. This also helps to see if a certain part looks good or needs to be changed and done a different way, a very important step in the creation of the model. I usually also try to keep the different pieces and assembly simple.


So, heres the preview of the first stage of the model. Afterwards I will add color and texture, create the different details and accessories and the many Mini People. Then I will print it again, in color, test it again, and make sure everything is fine. And once assembled, take photos.
After that comes the tedious work of writing the instructions, which is a very important step to make sure everything is clear. Then the final layout and it is ready to post and available to download.

It is a long process, but always fun and challenging to create an actual 3D model of an idea first drawn on paper.